释题:令行禁止。虽然/command已经整合进入Skills,但“命令”对工程师来说有天然亲近感,仍值得单独一讲。在 Claude Code 里,令行禁止几乎可以直接翻译为:disable-model-invocation: true 。也就是说——没有用户触发,Claude 绝不主动执行。
你好,我是黄佳。
上一讲我们动手做了一个参考型 Skill——Claude 自动判断何时需要,按需加载知识。现在进入它的另一面:任务型 Skill(也可以称为命令型Skill吧)。
对于喜欢“偷懒”的程序员,创建了一个斜杠命令来取代简单工作步骤,是再自然不过的事情,比如“检查一下 git 状态,然后提交代码,消息是 “fix login bug” 这种任务,用这样一个命令,直达目标。不需要每次都解释。
咖哥:/commit fix login bug Claude:✓ 已提交:fix login bug (3 files changed) 咖哥:/commit update styles Claude:✓ 已提交:update styles (1 file changed)
这就是任务型 Skill 的价值:把重复的对话模式,变成可复用的快捷方式。

这一讲是这样安排的:我们先了解任务型 Skill 的核心机制,随后梳理动态上下文注入技巧和 Skill 内的 Hooks 功能,之后学习任务型 Skill的设计方法论和实战案例。
Skills vs Commands
早期,斜杠命令/Comands和Skills是两个独立组件。但在新版Claude Code中,Commands 已合并到 Skills,成为 Skills 的子集。
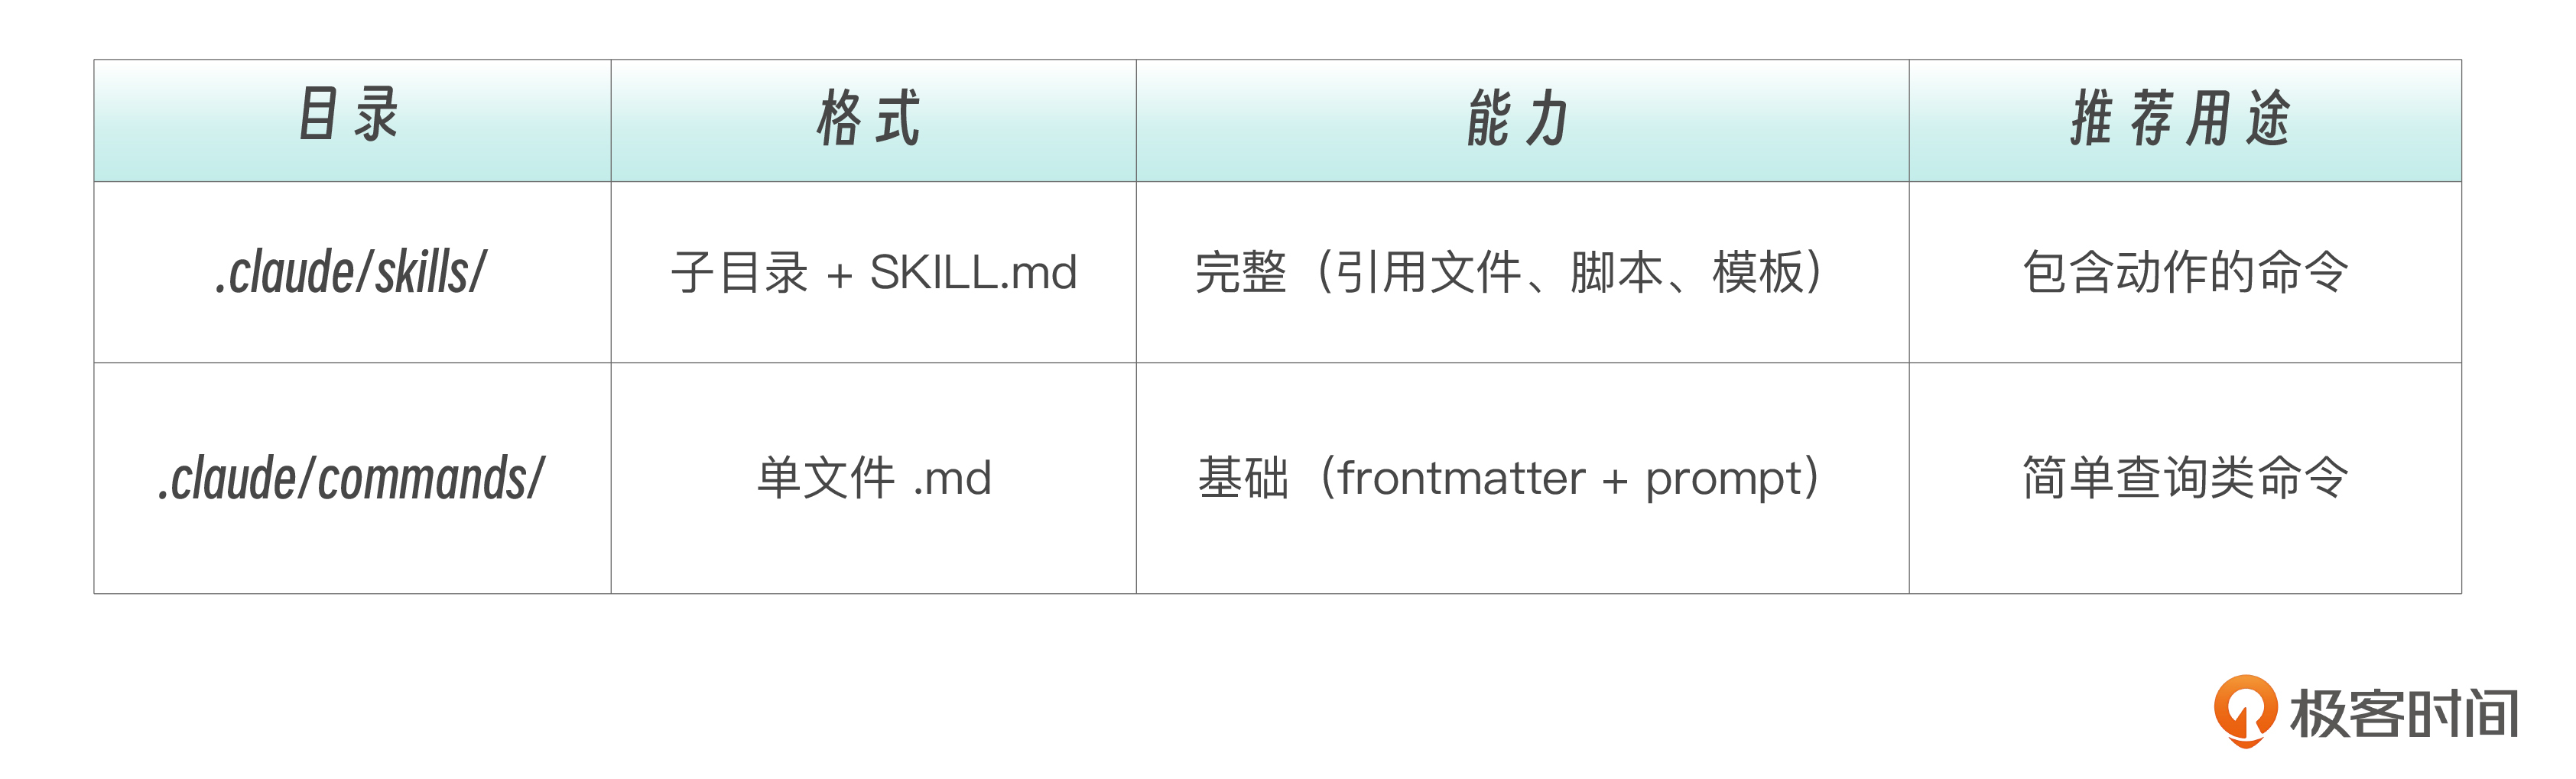
因此,在 .claude/commands/review.md 和 .claude/skills/review/SKILL.md 两个不同目录的文件,都会创建 /review。Skills 目录的额外优势是支持辅助文件目录(模板、示例、脚本等)。如果同名 Skill 和 Command 共存,Skill 优先。
下面的对比主要是帮助你理解历史演进和两种目录结构的差异。
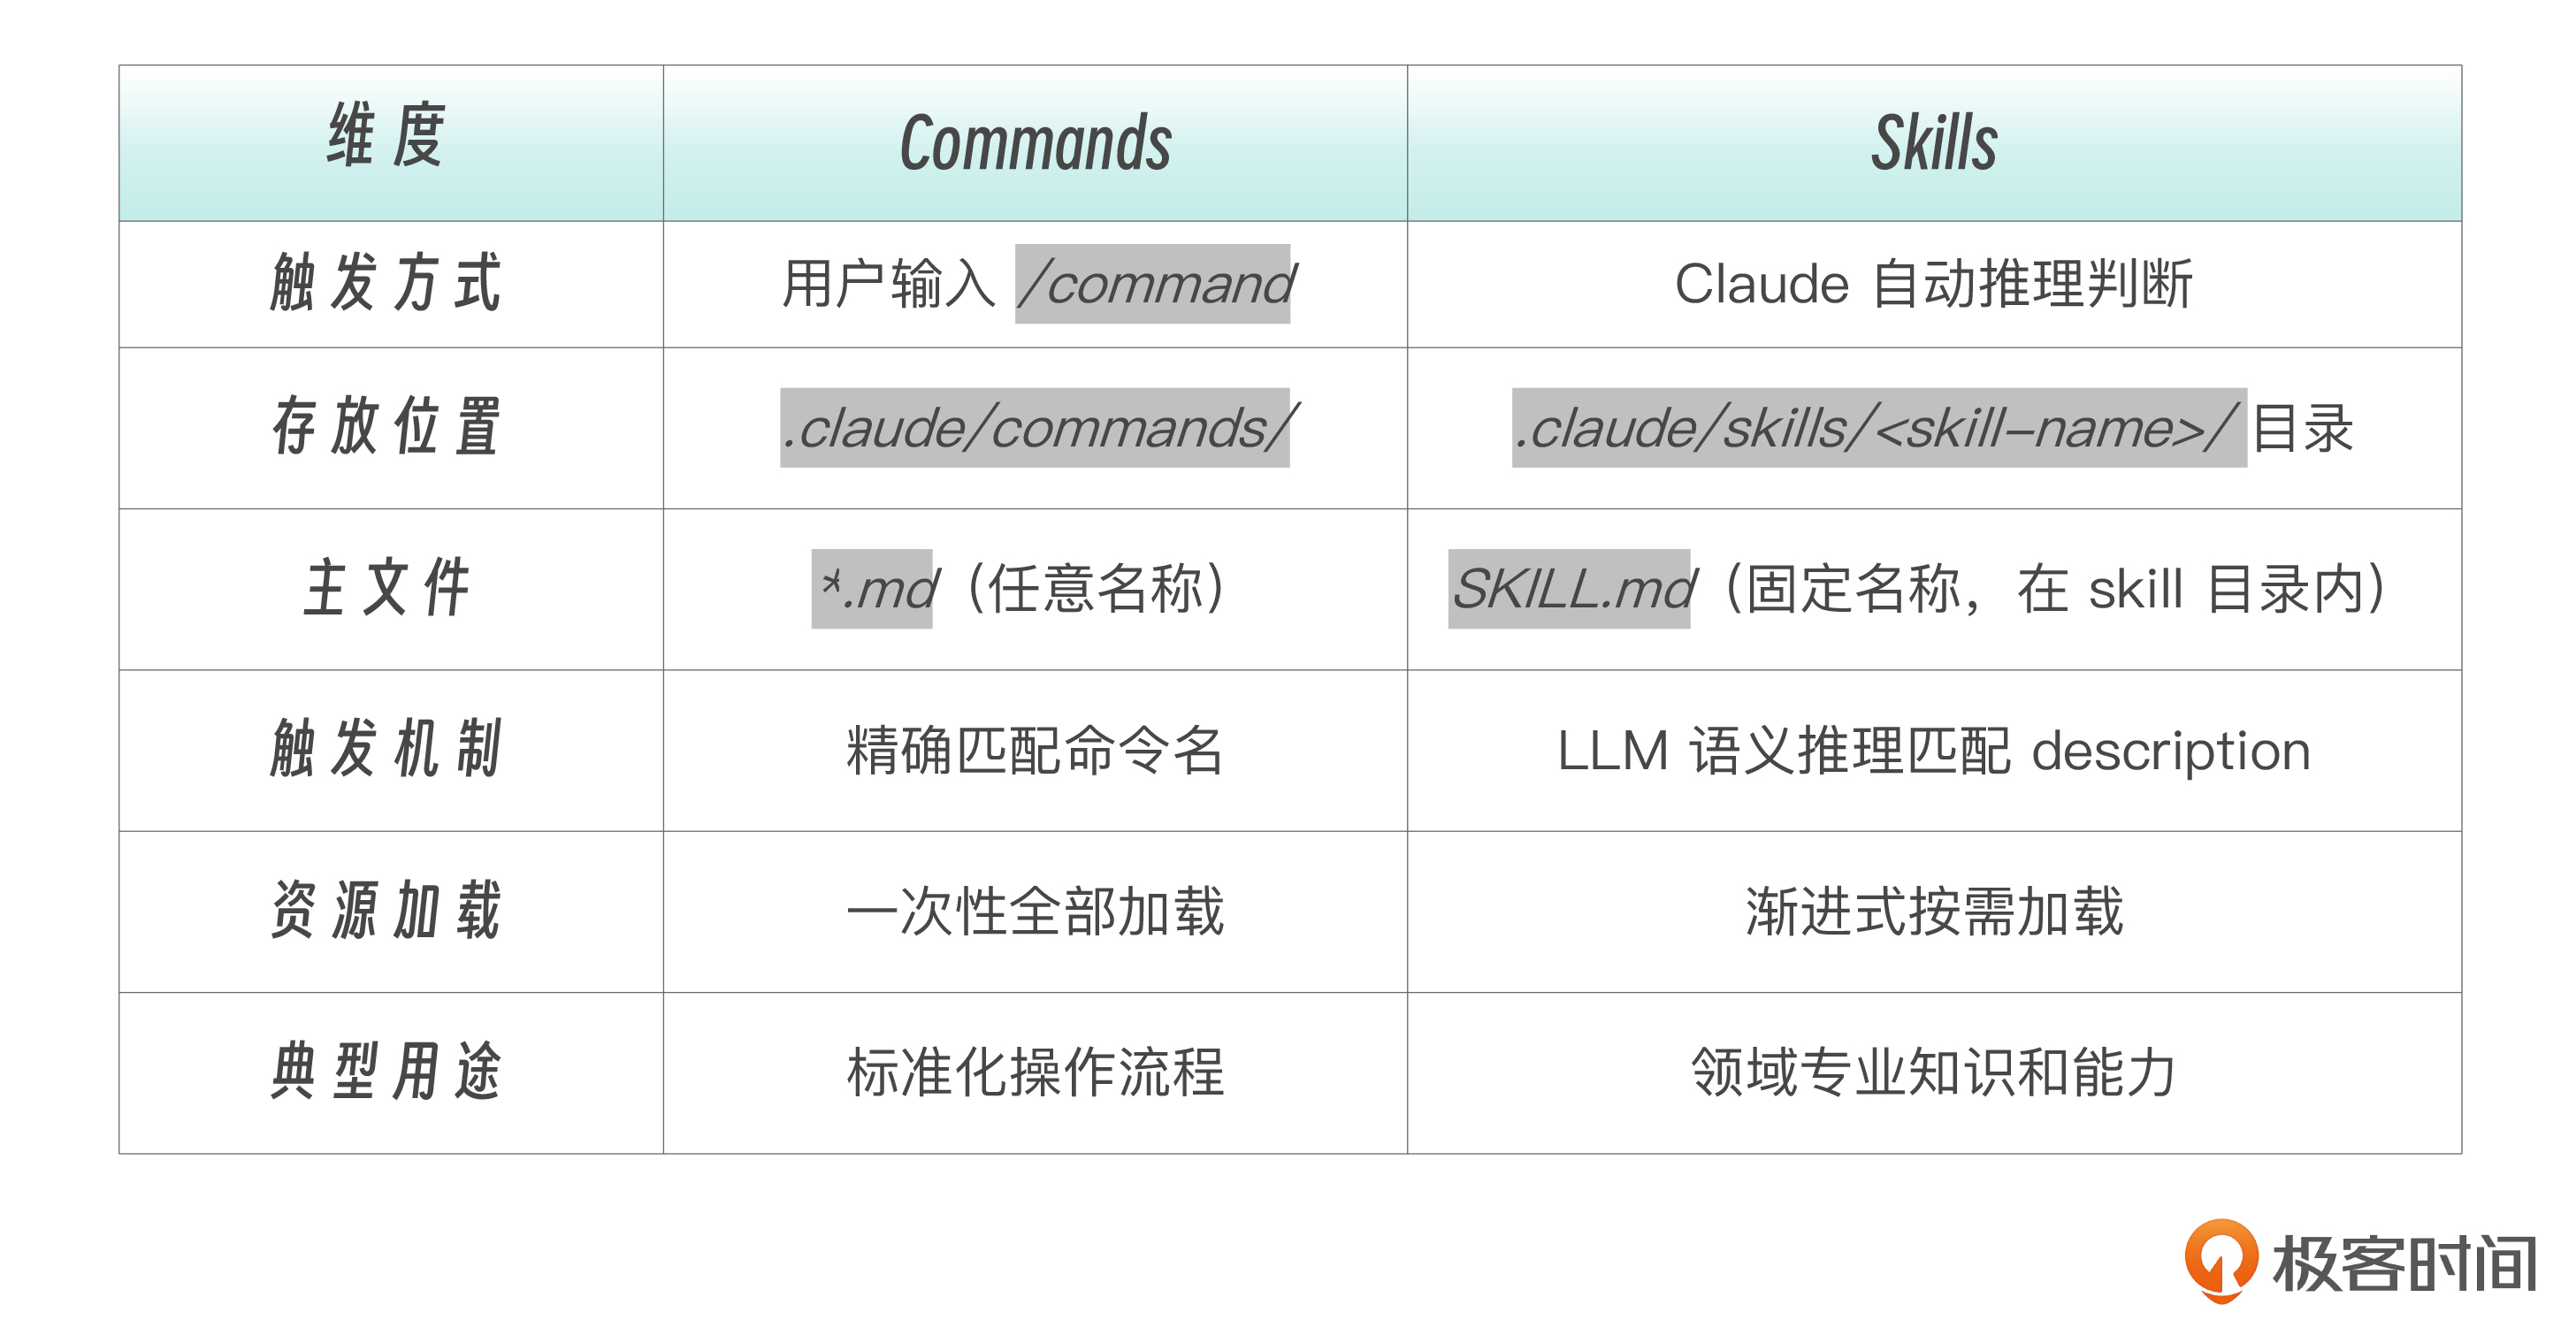
什么时候用 Commands 目录?已有的 .claude/commands/ 文件继续有效,不需要迁移。
什么时候用 Skills 目录?新建命令推荐使用 Skills 目录,因为支持辅助文件和更完整的 frontmatter。
任务型 Skill 的核心机制
在上一讲中,我们曾经介绍过两大类型的任务,参考型和任务型。简单来说,任务型 Skill 就是设了 disable-model-invocation: true 的 Skill。
参考型——Claude 自动选择是否使用
name: api-conventions description: API design patterns for this codebase. Use when writing or reviewing API endpoints.
任务型——必须用户手动触发
name: deploy description: Deploy the application to production disable-model-invocation: true

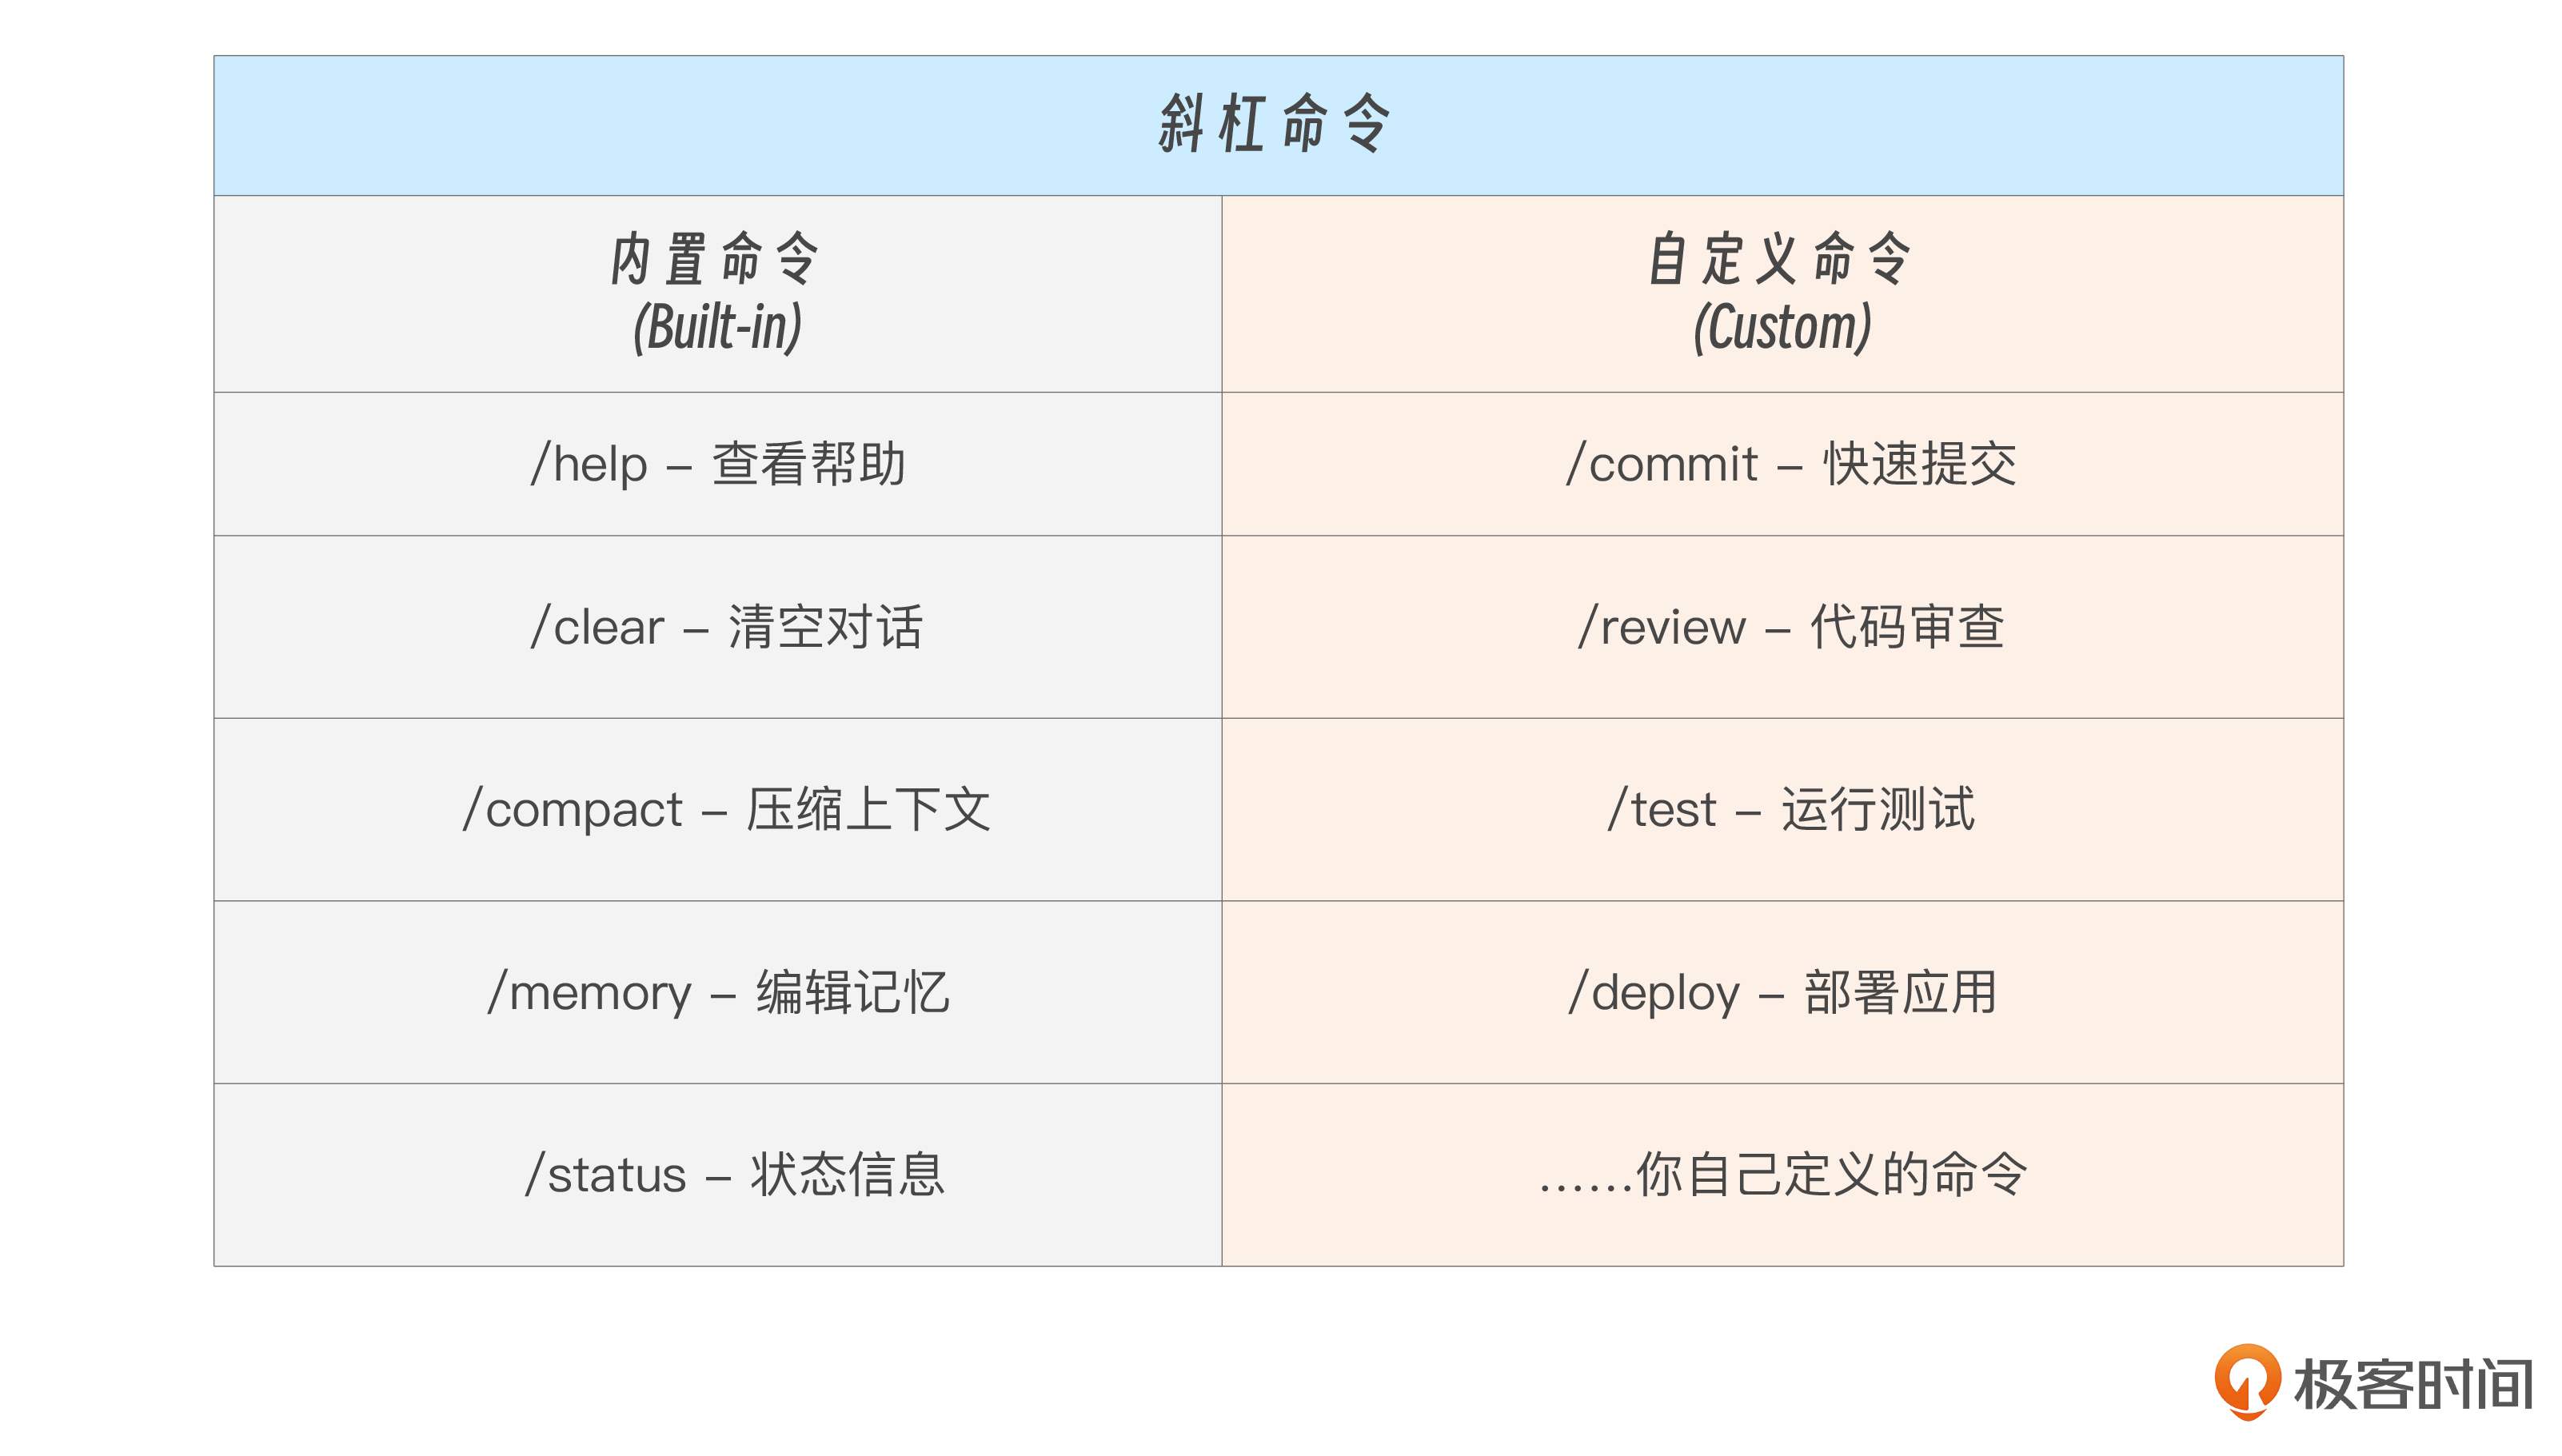
有两种类型的命令。内置命令是 Claude Code 自带的,用于控制会话和工具,你无法修改。 自定义命令是你创建的任务型 Skill,用于执行特定的工作流程,完全由你掌控。
任务型 Skill 可以放在两个目录下:
.claude/skills/
任务型 Skill 作用域如下:
项目级: .claude/skills/ 或 .claude/commands/ → 随项目 git 分发 用户级: ~/.claude/skills/ 或 ~/.claude/commands/ → 跨项目个人使用
通过 ARGUMENTS 给 Skill 传参
当你通过 /skill-name args 调用 Skill 时,args 会通过 $ARGUMENTS 注入到 Skill 内容中。
举例来说,当运行 /fix-issue 123 时,Claude 收到的内容是“Fix GitHub issue 123 following our coding standards…”。
name: fix-issue description: Fix a GitHub issue disable-model-invocation: true
Fix GitHub issue $ARGUMENTS following our coding standards.
- Read the issue description
- Understand the requirements
- Implement the fix
- Write tests
- Create a commit
注意,传参并不仅仅限于任务型Skill,但是,需要明确传参的场景,对于任务型Skill自然是显得更加常见。
Skill 支持两种参数传递方式。
单参数——$ARGUMENTS 接收所有参数。
description: Quick git commit argument-hint: [commit message] disable-model-invocation: true
Create a git commit with message: $ARGUMENTS
多参数—— $1,$2 接收位置参数:
description: Create a pull request argument-hint: [title] [description] disable-model-invocation: true
Title: $1 Description: $2
用法示例如下。
/commit fix login bug # $ARGUMENTS = "fix login bug" /pr-create "Add auth" "JWT" # $1 = "Add auth", $2 = "JWT"
可以用 $ARGUMENTS[N] 或简写 $N 访问特定位置的参数:
name: migrate-component description: Migrate a component from one framework to another
Migrate the $0 component from $1 to $2. Preserve all existing behavior and tests.
例如,/migrate-component SearchBar React Vue 中,$0 被替换为SearchBar, $1 为React, $2 为Vue。
Claude Code是非常灵活的,如果 Skill 中根本就没有定义 $ARGUMENTS,而你在调用Skill的时候又偏偏传递了参数进去。那也不怕,Claude Code 会自动在内容末尾追加 ARGUMENTS: <用户输入>,确保参数不会丢失。
此外,还可以通过 ${CLAUDE_SESSION_ID} 变量传入当前会话 ID,可用于把日志关联到当前会话。
! command 动态上下文注入
下面我们讲一讲任务型Skill的动态上下文注入。
首先我们说,Skills中那么多文字和信息,其实归根结底还是Prompt,需要Claude Code(工具)发给Claude或者GLM/Qwen等模型来处理。而模型启动时并不知道和当前技能相关的上下文,这一功能刚好可以解决该问题。
啥意思?且听我慢慢道来。
当用户输入 /pr-create "Add auth" 时,模型收到的只是 Prompt 文本。它不知道:
当前在哪个分支
有哪些 commit 待合并
改了哪些文件
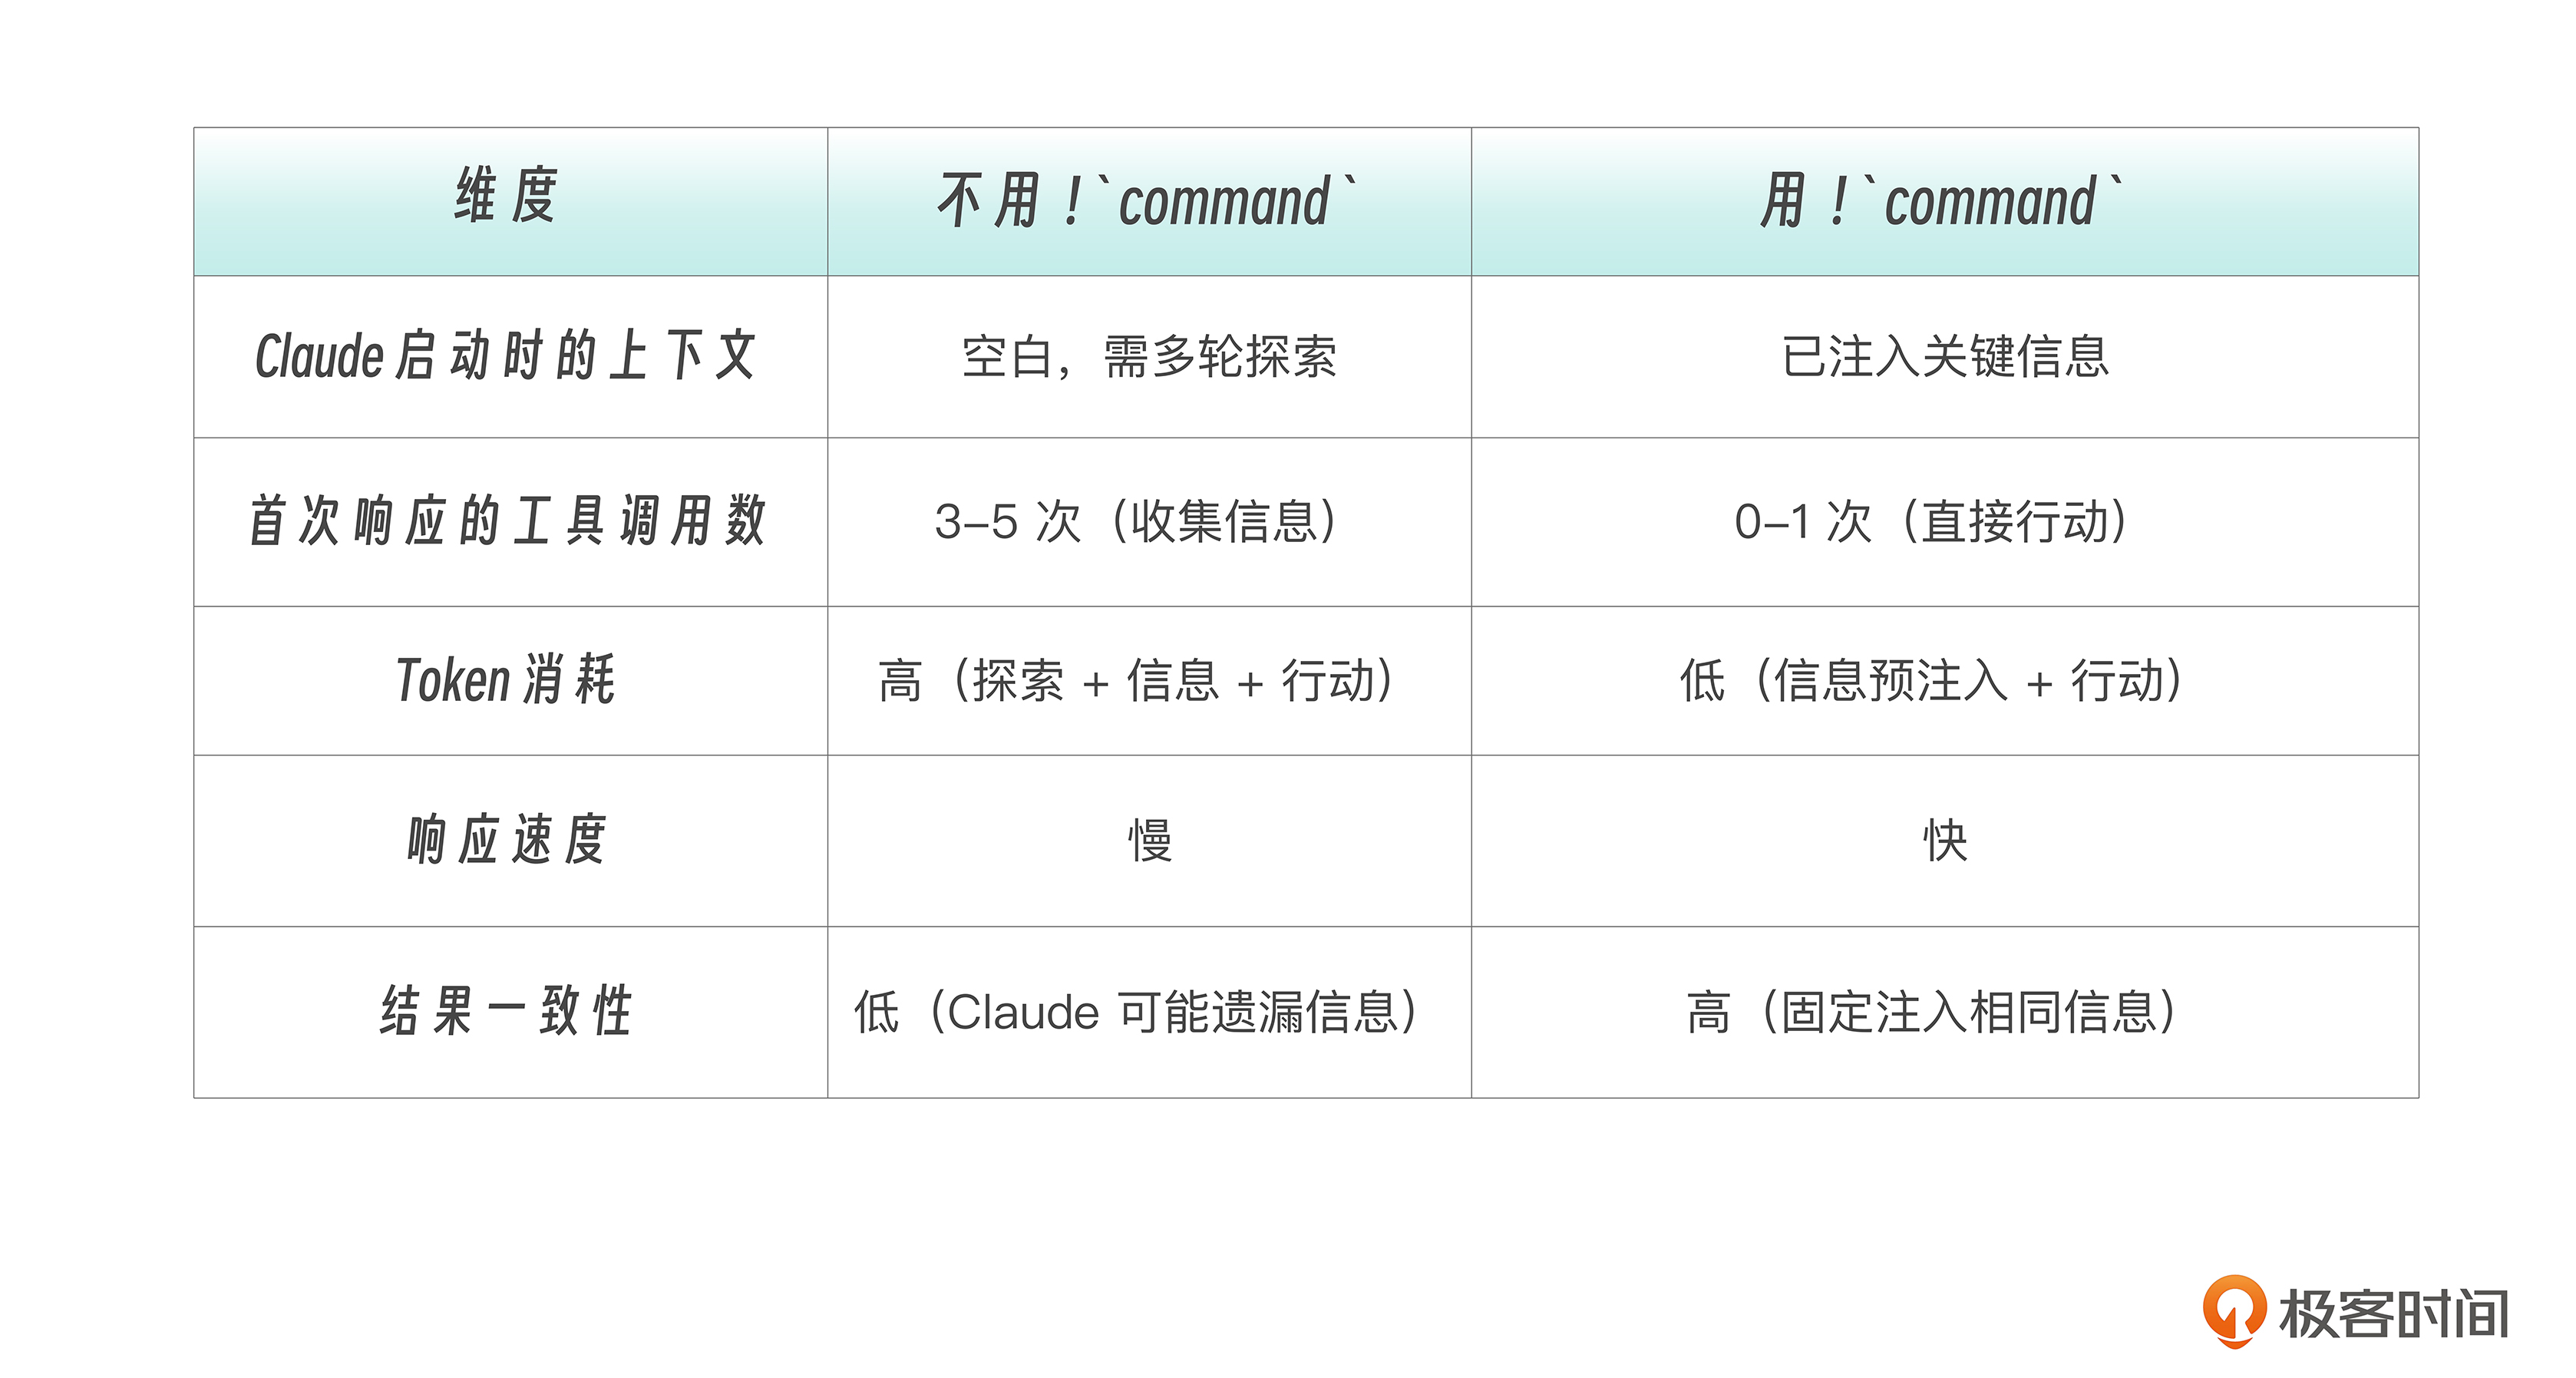
如果不预注入上下文,其实模型也会先花多轮工具调用去收集这些信息,任务虽然还是能完成,但浪费 token 和时间。
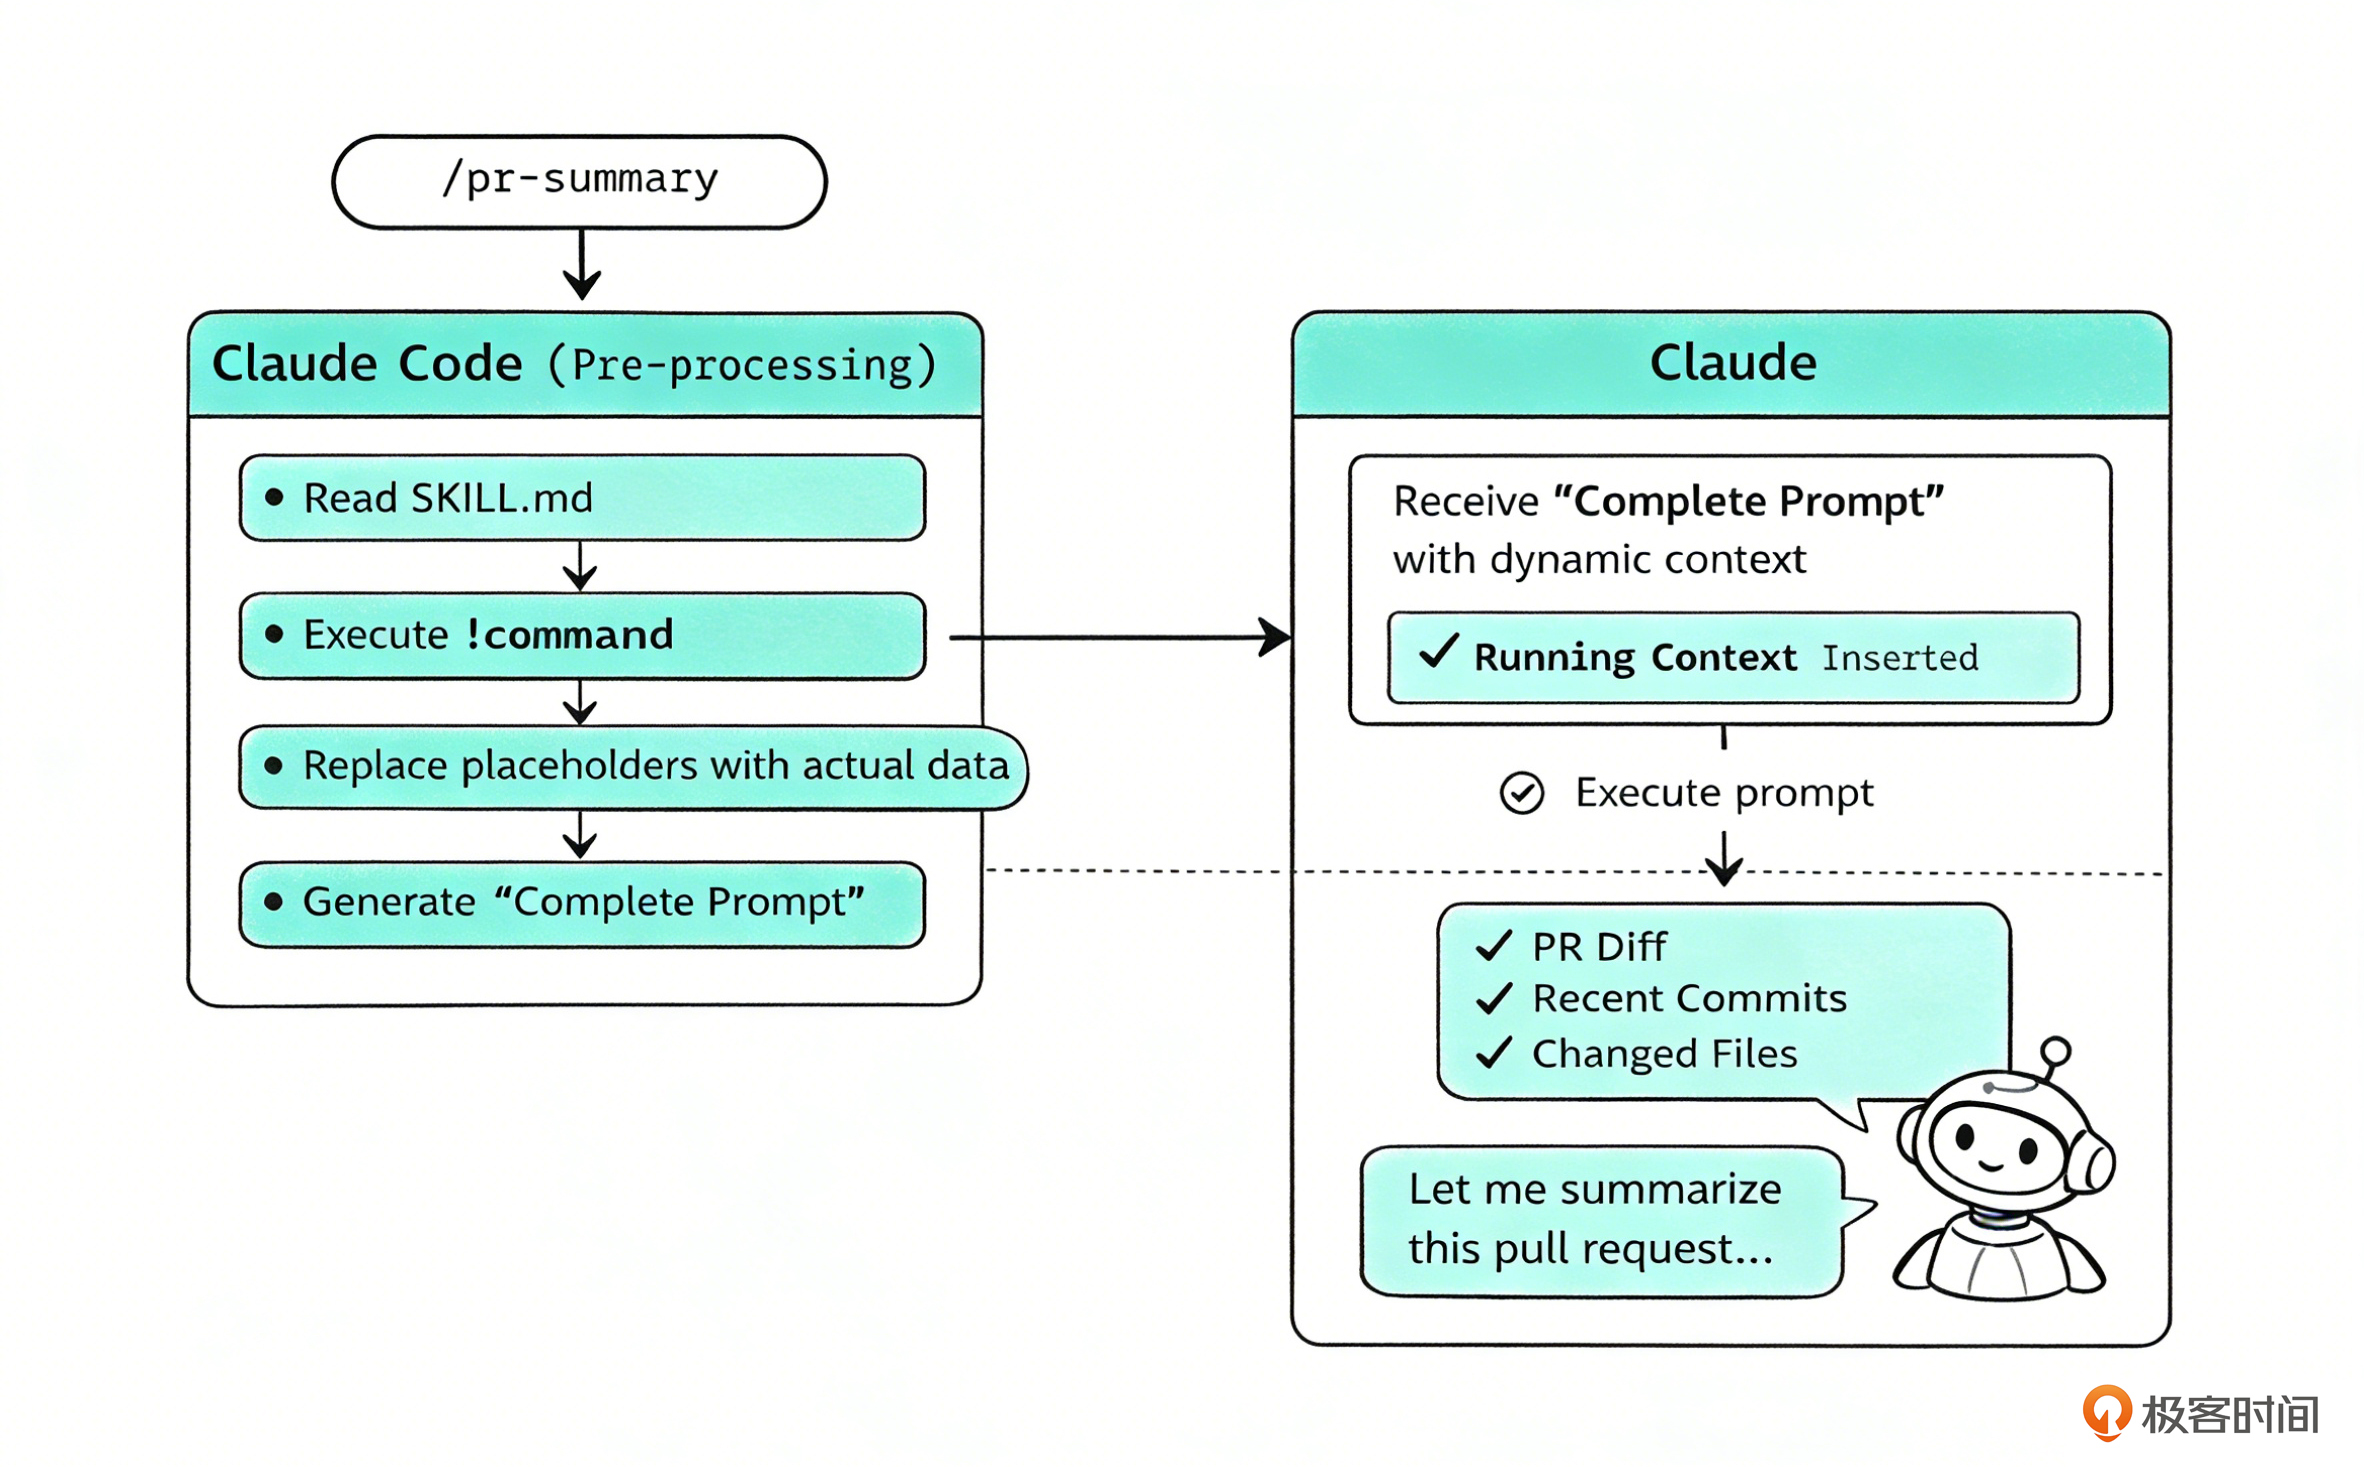
而 ! command 是 Skill 文件的预处理器——在文件内容发送给模型 之前,先在 shell 中执行这些预设的命令,然后把它们的输出结果内联替换到 Prompt 中,再去执行新的命令。
执行流程如下:
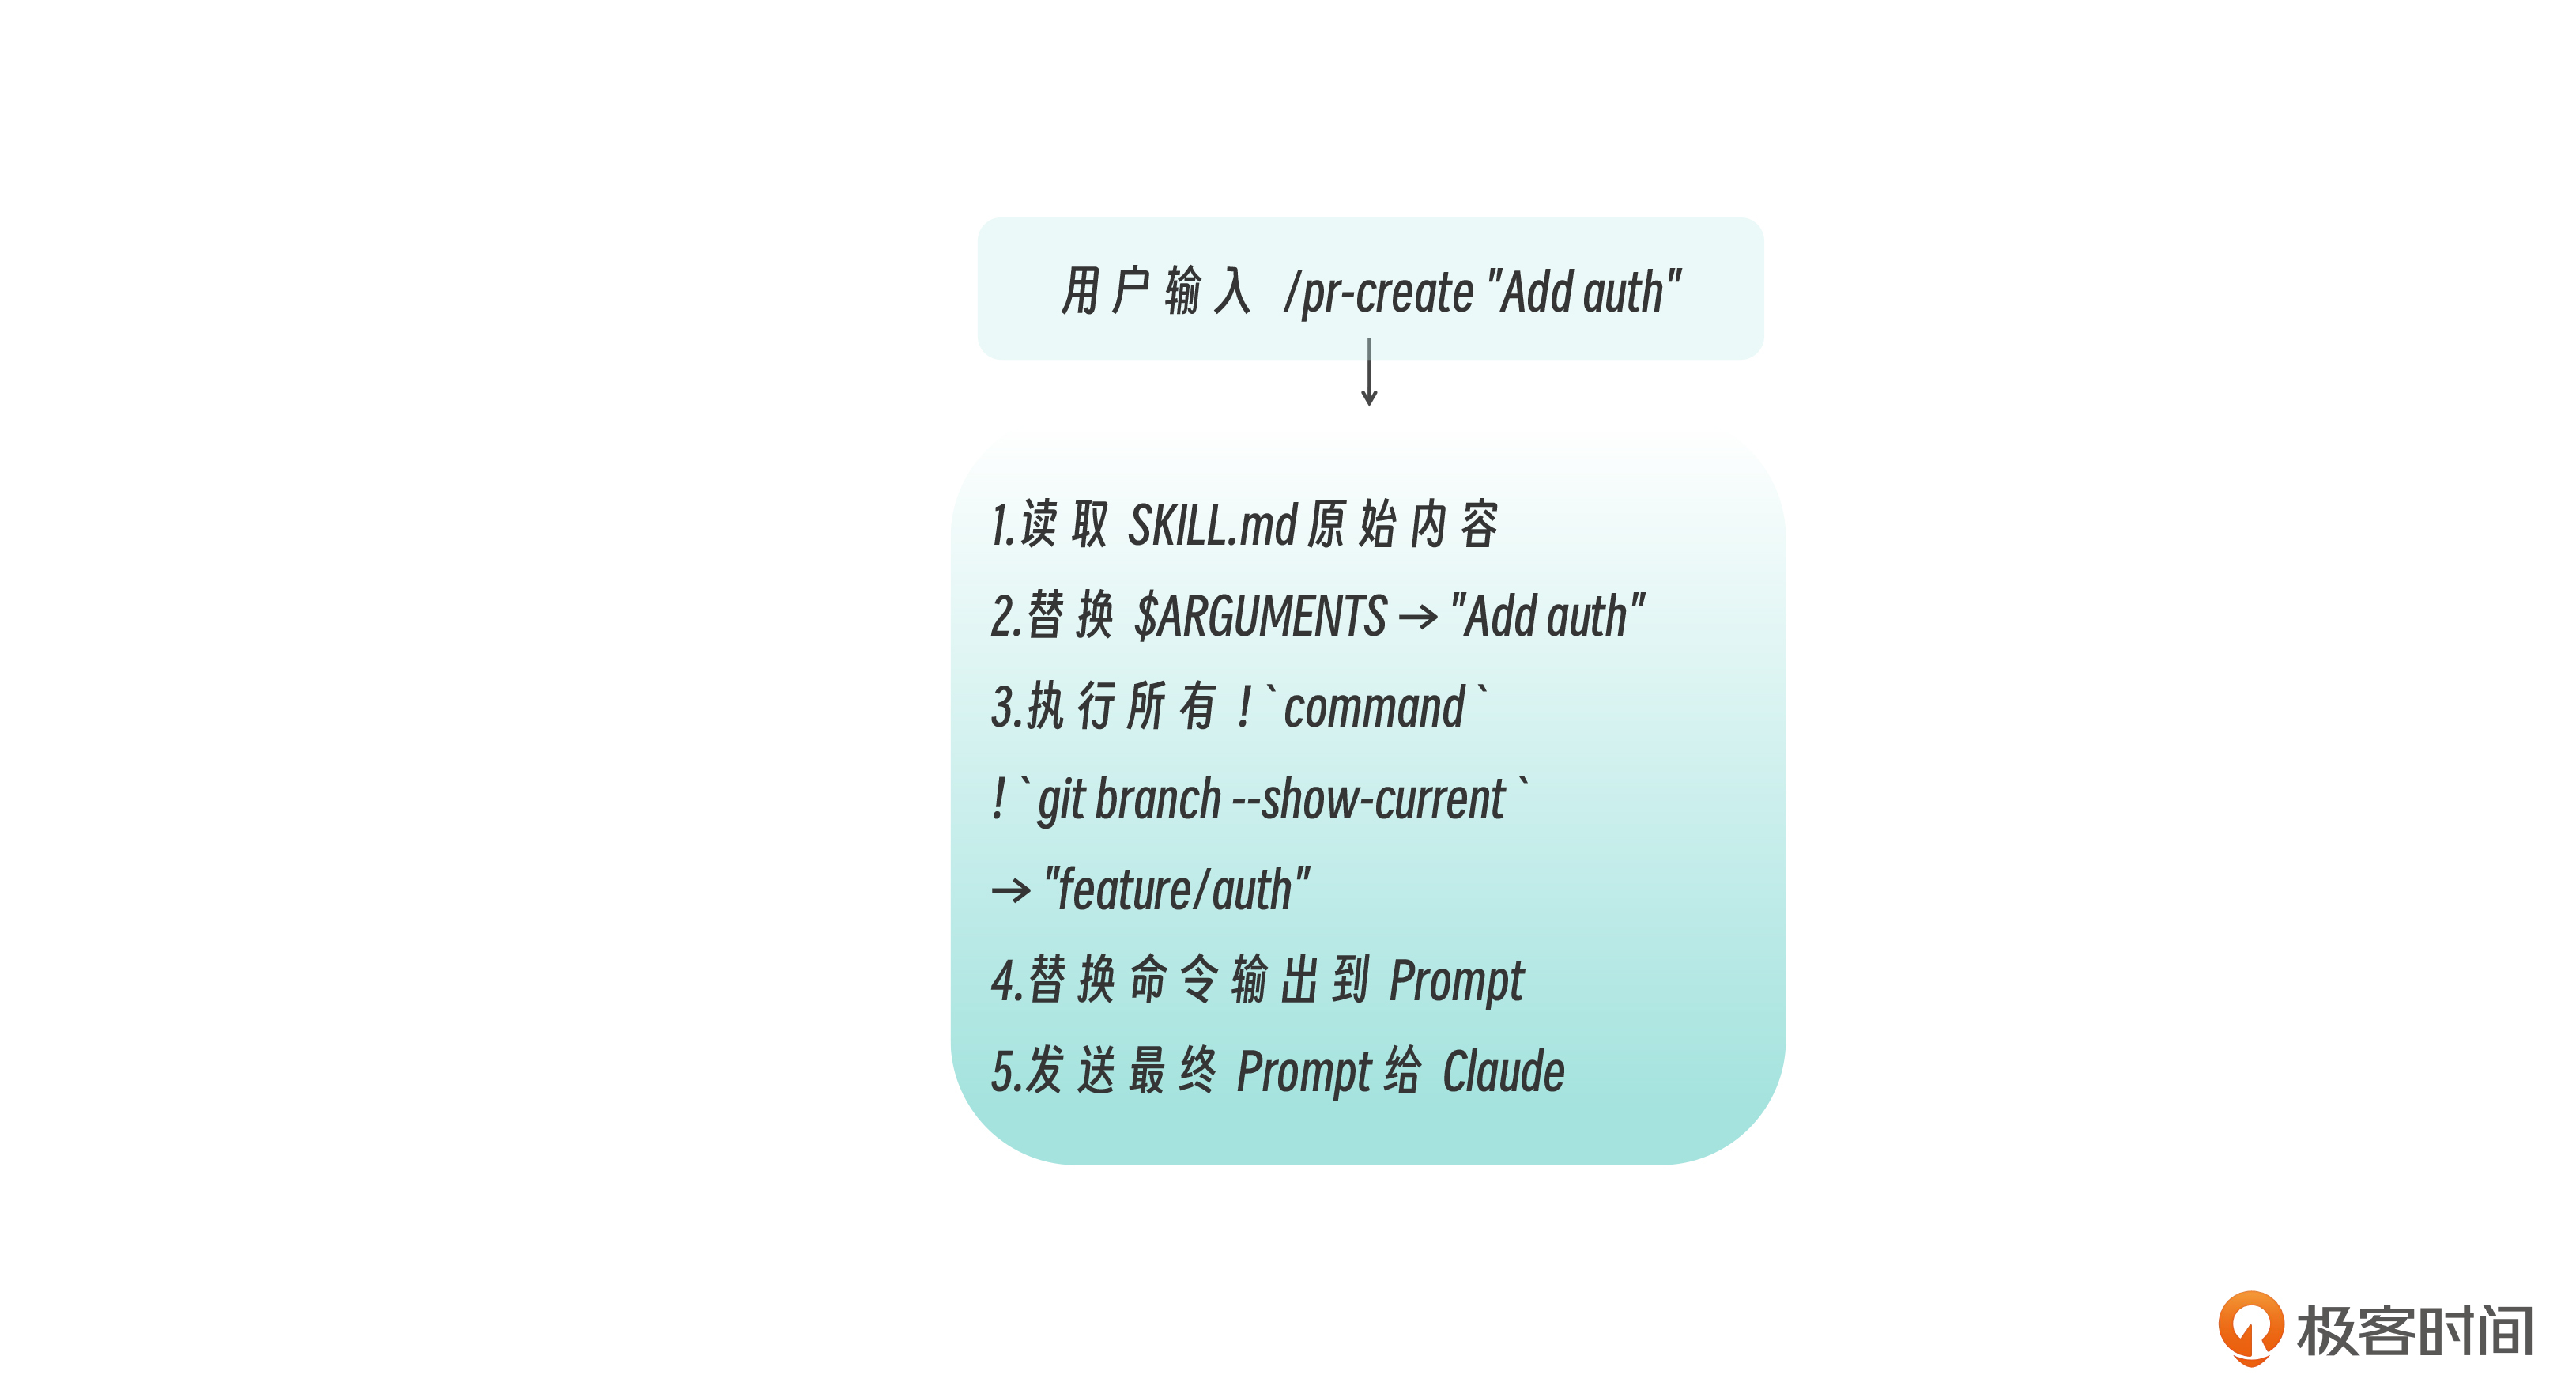
下面的示例中,我们为pr-create命令设置 ! command ,让它能够动态接收上下文(上下文就是在技能中预设的 ! command 的输出)。
Current Context (Auto-detected)
Current branch:
!git branch --show-current
Recent commits on this branch:
!git log origin/main..HEAD --oneline 2>/dev/null || echo "No commits ahead of main"
Files changed:
!git diff --stat origin/main 2>/dev/null || git diff --stat HEAD~3
Claude 实际收到的 Prompt(替换后):
Current Context (Auto-detected)
Current branch: feature/auth
Recent commits on this branch: a1b2c3d Add JWT middleware d4e5f6g Add login endpoint g7h8i9j Add user model
Files changed: src/auth/middleware.ts | 45 +++ src/auth/login.ts | 82 +++ src/models/user.ts | 34 +++ 3 files changed, 161 insertions(+)
这样,Claude 启动 /pr-create "Add auth" 时就拥有了完整上下文,可以直接生成 PR 标题和描述,无需额外再进行多一次工具调用。
我给上面的过程画了个图,方便大家更清晰地体会这个过程。
! command 可以与 $ARGUMENTS 组合,在动态注入时使用参数值。
description: Show git blame for a file argument-hint: [file path] disable-model-invocation: true allowed-tools: Bash(git:*)
Analyze the git history for: $ARGUMENTS
File blame:
!git blame $ARGUMENTS 2>/dev/null | head -30 || echo "File not found"
Recent changes:
!git log --oneline -5 -- $ARGUMENTS 2>/dev/null || echo "No history"
$ARGUMENTS 参数会先被替换,再执行 ! command。这意味着用户输入会进入 shell 命令——因此务必在 allowed-tools 中严格限制可执行范围。
动态注入的工程价值和优势列表分析如下。
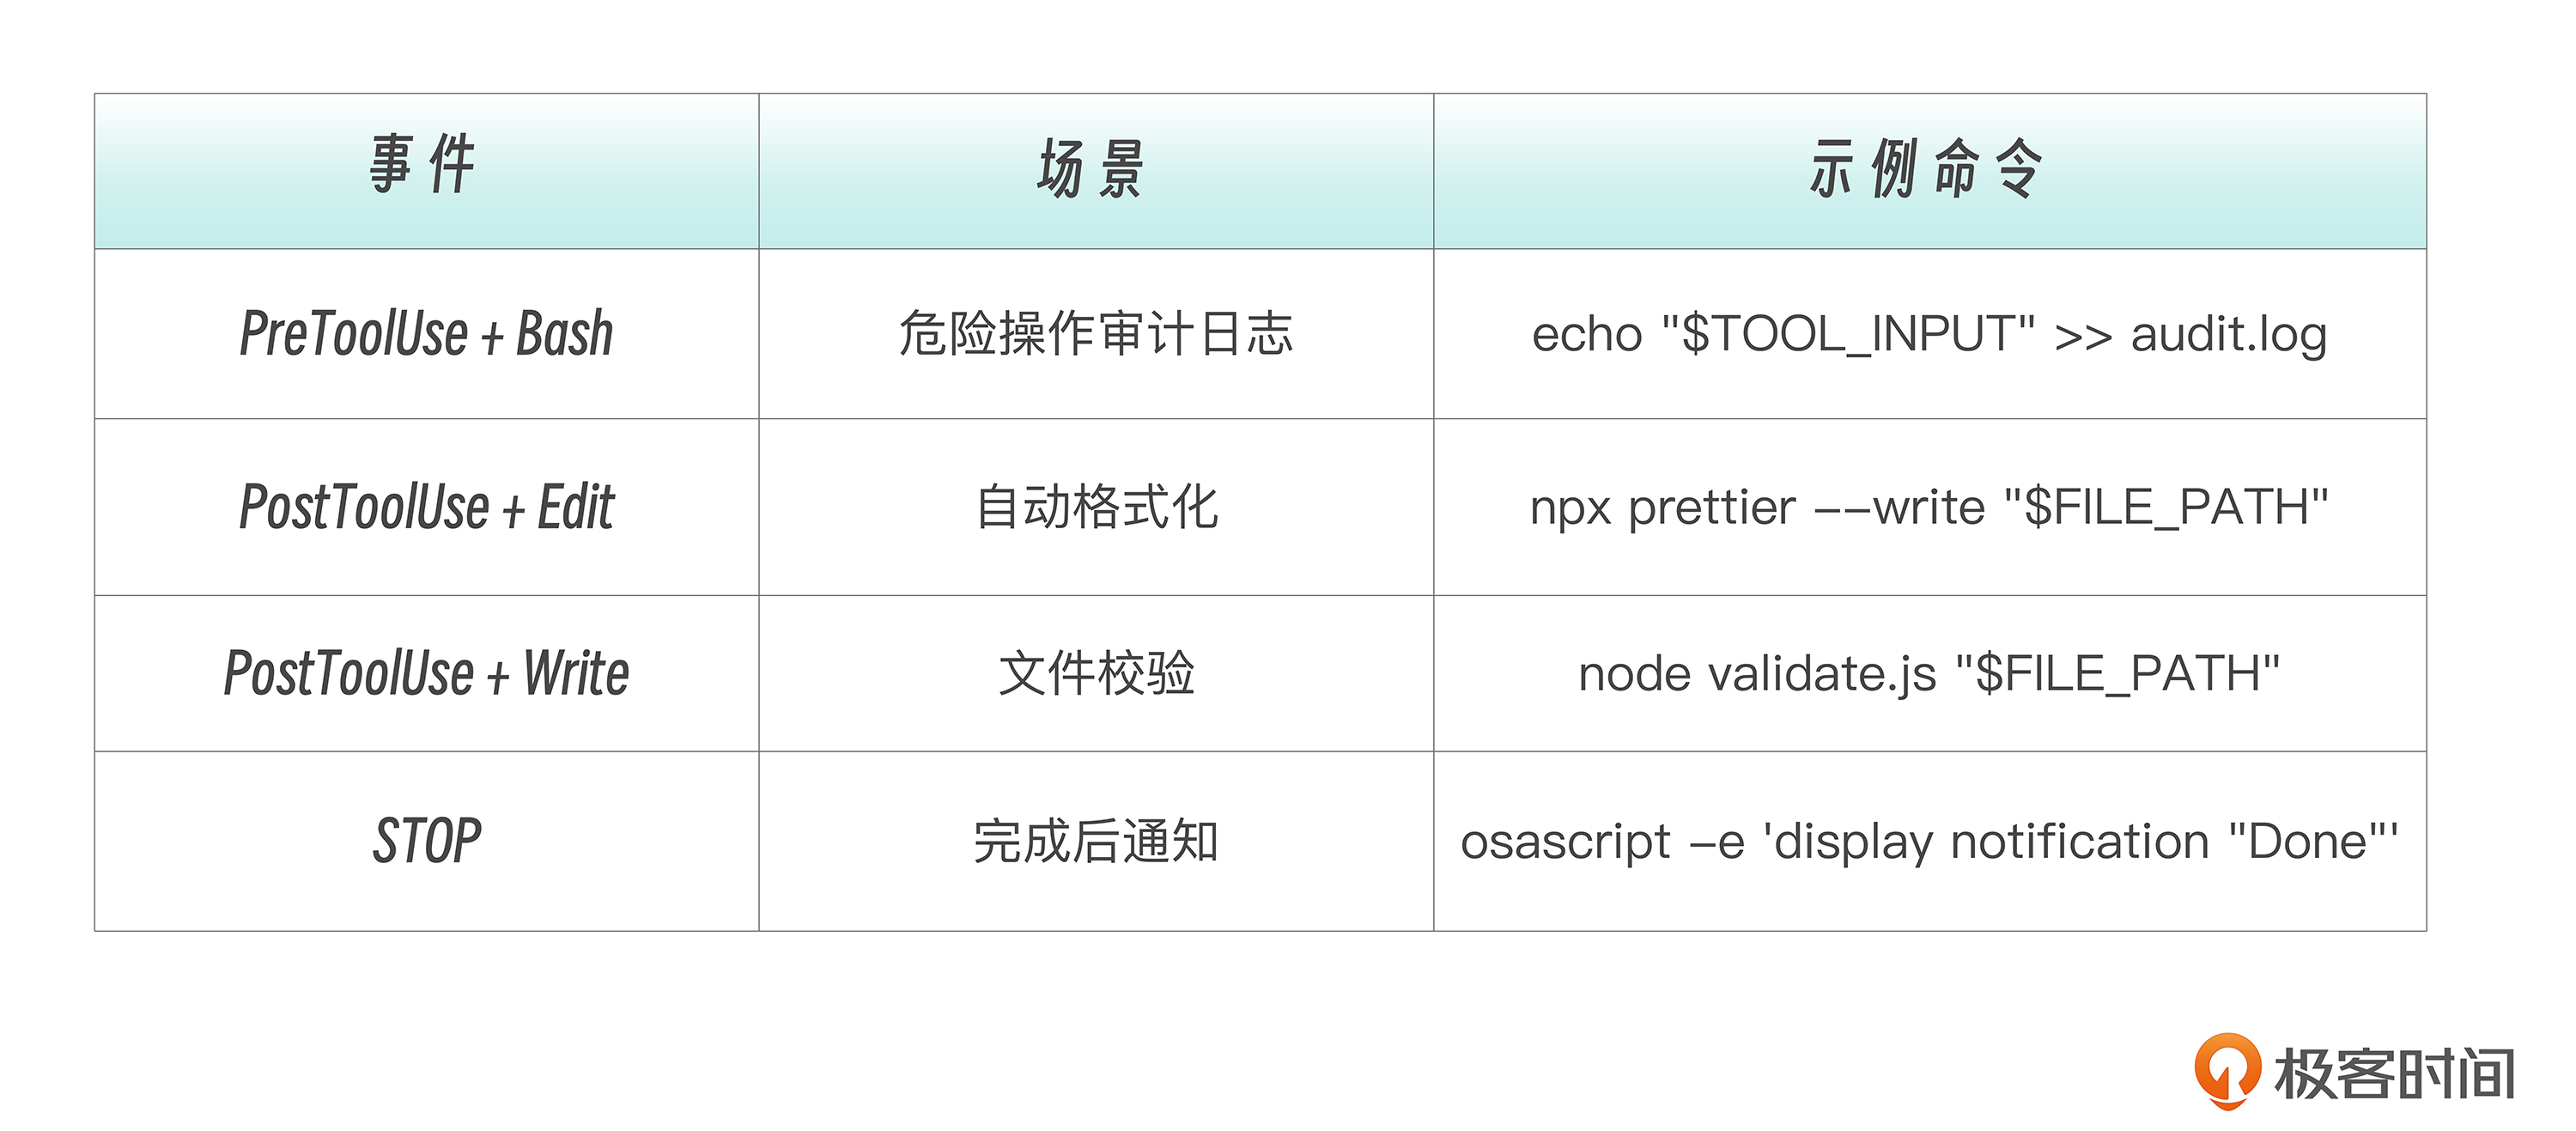
Skill 内的 Hooks
下面我们再来看看 Hooks 在任务型 Skill 中的作用。
任务型 Skill 执行的是有“副作用”(side-effect)的操作——提交代码、部署应用、修改文件。这类操作需要自动化的安全网。

Hooks 配置很简单,只需要在 frontmatter 的 hooks 字段中定义:
description: Safe deployment command
disable-model-invocation: true
allowed-tools: Bash(git:), Bash(npm:), Bash(ssh:*)
hooks:
PreToolUse:
- matcher: Bash
hooks:
- type: "command"
command: echo "About to run: $TOOL_INPUT" >> /tmp/deploy.log
PostToolUse:
- matcher: Edit
hooks:
- type: "command"
command: npx prettier --write "$FILE_PATH"
Deploy the application to staging environment.
Skill 内的 Hooks 不是一条一条平铺写的,而是按“事件 → 匹配规则 → 要执行的命令列表”一层一层包起来。也就是一个三层树形结构,而不是一行一个 Hook —— 这是为了支持多事件 × 多工具 × 多动作的组合扩展,我们后续Hook章节再详述。
Skill 中常用 Hook 模式如下。
Skill Hooks与全局 Hooks 的区别如下。
任务型 Skill 设计方法论
设计一个任务型 Skill 时,我给你提供一个七步设计清单,引导你按顺序回答后面的问题。
- 动作是什么? → 命名(commit、deplo,y、review)
- 谁能触发? → disable-model-invocation: true
- 需要什么权限?→ allowed-tools 精确到命令级
- 启动时需要什么上下文?→ !
command预注入 - 执行过程需要什么安全网?→ hooks
- 输出量大不大?→ 大则 context: fork
- 用什么模型? → model(简单 haiku,复杂 sonnet)
任务型 Skill的几个重要设计原则如下:
单一职责原则:一个命令做一件事。
✅ /commit, /push, /review ❌ /git-all-in-one
清晰命名原则:从命令名就能知道它做什么。
✅ /test:unit, /deploy:staging, /pr-create ❌ /do-stuff, /cmd1, /x
有意义的参数提示:让使用者了解如何传参。
✅ argument-hint: [commit message] ✅ argument-hint: [source file] [target directory] ❌ argument-hint: [args]
权限最小化原则:严格控制每个任务的权限边界。
✅ 精确授权——只允许 git 的特定子命令
allowed-tools: Bash(git status:), Bash(git add:), Bash(git commit:*)
❌ 过于宽泛——等于授权所有 shell 命令
allowed-tools: Bash(*)
权限范围的设计经验我也梳理了表格,供你参考。
错误处理也非常重要,不可忽视。应该在说明中显式处理错误路径。
Steps
- Check if we're in a git repository
- If not, inform the user and stop
- Check for uncommitted changes
- If none, inform the user that there's nothing to commit
- Otherwise, proceed with the commit
实战项目:团队标准命令集
现在让我们创建一套真正实用的团队命令。
课程示例路径:我目前是把这一部分的示例文件放在 Repo的 05-Commands/projects/ 下,你可以尝试着把这些斜杠命令迁移到Skills目录。 项目结构如下。
.claude/skills/ # 推荐:Skills 目录 ├── committing/SKILL.md # /committing 快速提交 ├── reviewing/SKILL.md # /reviewing 代码审查 ├── pr-creating/SKILL.md # /pr-creating 创建 PR └── testing/SKILL.md # /testing 运行测试
.claude/commands/ # 兼容:Commands 目录 └── git/ ├── status.md # /git:status └── log.md # /git:log
Skills 目录名即命令名。包括简单的查询类命令(git:status、git:log)以及包含动作的命令建议。建议你把它们迁移到 Skills 目录以获得 disable-model-invocation 等高级能力。
命令一:智能提交 /commit
.claude/skills/committing/SKILL.md(或 .claude/commands/commit.md):
description: Quick git commit with auto-generated or specified message argument-hint: [optional: commit message] disable-model-invocation: true allowed-tools: Bash(git status:), Bash(git add:), Bash(git commit:), Bash(git diff:) model: haiku
Create a git commit.
If a message is provided: $ARGUMENTS - Use that as the commit message
If no message is provided:
- Analyze the changes with git diff --staged (or git diff if nothing staged)
- Generate a concise, meaningful commit message
Steps
- Check
git statusto see current state - If nothing staged, run
git add .to stage all changes - Review what will be committed with
git diff --staged - Create commit:
- If
$ARGUMENTSis provided, use it as the message - Otherwise, generate a message based on the diff
- Show the commit result
Commit Message Format
- Start with type:
feat:,fix:,docs:,refactor:,test:,chore: - Be concise but descriptive (max 72 chars for first line)
- Example:
feat: add user authentication with JWT
Output
Show a brief confirmation: ✓ Committed: [commit message] [number] files changed
使用方式如下:
自动生成 commit message
/commit
使用指定的 message
/commit fix: resolve login validation bug
这个命令可以自动生成 commit message,也可以使用用户提供的说明。有参数用参数,没参数自动生成;内部会强制遵循 conventional commits 格式;使用 haiku 模型,响应快;而且只授权 git 相关命令。
命令二:代码审查 /review
用于自动进行代码的审查
.claude/skills/reviewing/SKILL.md(或 .claude/commands/review.md):
description: Review code for quality, bugs, and improvements argument-hint: [optional: file path] disable-model-invocation: true allowed-tools: Read, Grep, Glob, Bash(git diff:*)
Review code and provide feedback.
Target: $ARGUMENTS (or current git diff if not specified)
Review Focus Areas
- Bugs & Errors: Logic errors, null checks, edge cases
- Security: Input validation, injection risks, sensitive data exposure
- Performance: Obvious inefficiencies, N+1 queries, memory leaks
- Readability: Naming, complexity, documentation needs
Steps
- If file path provided, read that file
- If no path, run
git diffto see current changes - Analyze the code against the focus areas
- Provide structured feedback
Output Format
```markdown
Code Review
Summary
[One sentence overall assessment]
Issues Found
Critical (Must Fix)
- [issue]: [location] - [brief explanation]
Warnings (Should Fix)
- [issue]: [location] - [brief explanation]
Suggestions (Nice to Have)
- [suggestion]: [location] - [brief explanation]
What's Good
- [positive observation]
Guidelines
Be specific about locations (file:line if possible) Provide actionable feedback, not just criticism Don't nitpick style unless it impacts readability Acknowledge good patterns you see
使用方式如下:
```bash
审查当前 git diff
/review
审查特定文件
/review src/auth/login.ts
该命令只授权 Read、Grep、Glob,不能修改代码,统一的反馈格式,便于团队理解。此外还有优先级分类功能:Critical > Warning > Suggestion。
命令三:创建 PR /pr-create
.claude/skills/pr-creating/SKILL.md(或 .claude/commands/pr-create.md):
description: Create a pull request with auto-detected context argument-hint: [title] [description] disable-model-invocation: true allowed-tools: Bash(git:), Bash(gh:)
Create a pull request.
Title: $1 Description: $2
Current Context (Auto-detected)
Current branch:
!git branch --show-current
Recent commits on this branch:
!git log origin/main..HEAD --oneline 2>/dev/null || echo "No commits ahead of main"
Files changed:
!git diff --stat origin/main 2>/dev/null || git diff --stat HEAD~3
Steps
- Ensure we're not on main/master branch
- Push current branch to remote (if not already)
- Create PR using
gh pr create: - Title: $1 (or auto-generate from branch name)
- Body: $2 (or auto-generate from commits)
- Return the PR URL
PR Body Template
If $2 is not provided, generate:
```markdown
Summary
[Auto-generated from commit messages]
Changes
[List of changed files with brief descriptions]
Testing
- [ ] Tests pass locally
- [ ] Manual testing completed
Created with /pr-create
Output
✓ PR Created: [URL]
Title: [title] Branch: [branch] → main Changes: [n] files
其中的 !… 就是我们刚才学过的 ! \command` 动态上下文注入,Claude 启动时就拿到了当前分支、commit 记录和文件变更。
使用方式如下:
```bash
自动生成标题和描述
/pr-create
指定标题
/pr-create "Add user authentication"
指定标题和描述
/pr-create "Add user authentication" "Implements JWT-based auth with refresh tokens"
当命令越来越多时,可以用目录结构组织它们:
.claude/commands/ ├── commit.md → /commit ├── review.md → /review ├── git/ │ ├── status.md → /git:status │ ├── log.md → /git:log │ └── sync.md → /git:sync └── test/ ├── unit.md → /test:unit └── e2e.md → /test:e2e
命名规则是当目录名成为前缀,用冒号 : 分隔。这样做的好处是相关命令归类在一起,避免命令名冲突,而且输入 /git: 会提示所有 git 相关命令。
本讲小结
简单总结一下。
任务型 Skill =disable-model-invocation: true ——这个字段决定了 Skill 是“知识提供者”还是“动作执行者"。任务型绝不让 Claude 自作主张触发。
然后,我们学习了! command 动态上下文注入——让 Claude 启动时就拥有完整上下文,减少 3-5 次工具调用,提升响应一致性。
Skill 内 Hooks 提供执行期间的安全网,仅在 Skill 生命周期内生效,随 Skill 一起分发。
在设计方法论中,我们给出七步设计清单:动作 → 触发 → 权限 → 上下文 → 安全网 → 隔离 → 模型。尤其要强调的原则是权限最小化原则,allowed-tools 应该精确到命令级,不要随便用 Bash(*)。
从团队协作的视角来看,这里是一些最佳实践。
任务型 Skill 放在项目级 .claude/skills/(git 追踪,团队共享)
个人习惯性命令放在 ~/.claude/skills/(跨项目可用)
使用命名空间组织相关命令(git/、test/)
为每个 Skill 写清晰的 description 和 argument-hint
再给出一个很重要的观点——命令的价值在于积累——团队标准化流程就是把最佳实践固化为任务型 Skill。
最后,我想分享一个观点,任务型 Skill(用户触发动作)、参考型 Skill(Claude 匹配知识)、SubAgent(隔离执行)三者共存互补。
经过前面的学习,你已经知道 Commands 和 Skills 是同一个系统。现在我们用统一视角来理清三种能力扩展机制。

我们仍以“代码审查”为例,对比一下同一个需求的三种实现。
三种方案可以共存。一个成熟的团队工具箱通常这样组织:
当Skill + SubAgent 配合起来,任务型 Skill 可以通过 context: fork 在子代理中隔离执行(第 12 讲我们再详细学习 context: fork)。
description: Full codebase review disable-model-invocation: true context: fork allowed-tools: Read, Grep, Glob
这样 /review 的大量输出不会污染主对话上下文。
各种Skills和SubAgents如何组合使用,上面是我的一些粗浅看法。这些技能你都怎么用,怎么“穿搭“,希望大家在评论区和群里多多讨论。
思考题
1.你的项目中有哪些重复性操作适合封装成任务型 Skill?列出至少 3 个,并为每个写出 description 和 argument-hint。
2.设计一个 /deploy Skill:考虑触发控制(谁能触发?)、参数传递(部署到哪个环境?)、工具限制(需要哪些权限?)、动态注入(需要预加载什么上下文?)。写出完整的 frontmatter 和 SKILL.md 骨架。
3.对比 ! command 和让 Claude 自己调用工具获取信息的方式。在什么场景下前者更优?什么场景下让 Claude 自己探索更好?
4.你的团队有 5 个人,每人常用 3-4 个自定义命令。如何用命名空间和作用域(项目级 vs 用户级)来组织这些命令,避免冲突又方便共享?
下一讲预告
这一讲我们掌握了任务型 Skill 的完整设计方法论,并构建了 /commit、/review、/pr-create 等实战命令。
但当 Skill 变得复杂——需要包含多个参考文档、示例代码、脚本工具时,如何组织才能最大化 token 效率?
下一讲,我们将学习循序渐进——渐进式披露架构设计,通过一个完整的财务分析 Skill 项目,掌握目录页、章节、附录的三层结构设计。
欢迎你在留言区和我交流讨论。如果这一讲对你有启发,别忘了分享给身边更多朋友。